Unraid - Remote backup with a Raspberry Pi
Backing up of your apps, data, etc. on any system, big or small, is an important step in ensuring the long term integrity of your data & allowing recovery from disaster.
Entire industries are built around this one function alone, in every market segment - home, pro-sumer, business & enterprise markets.
The issue however is that generally these solutions are either costly, or rely on monthly fees.
But what if we could do it for less than $100 in hardware cost, and use open source software to achieve the same goals?
Well, that's what we're going to outline here.
Pre-Req's
- You have WireGuard setup on your home network in some form (container, PiVPN, Unraid Plugin, ect.)
- Your gateway has a static route set to inform your local LAN of the location of the VPN subnet (important!).
- You have a spare Raspberry Pi 3B+ (or better).
- You have a USB HDD/SSD (or normal drive + USB adaptor)
- You have a friend or family member to 'host' the solution.
Overview
The idea is that we will build a Raspberry Pi, with a storage drive, to function as a remote VPN client, that auto-connects back to your home network, to allow a backup program to use it as a storage target.
Step 1 - Install Raspberry Pi OS
The following YouTube video, provided by the Raspberry Pi Foundation is a great overview on how to use their excellent imaging software to write a Raspberry Pi OS image to a MicroSD Card.
I would recommend the usage of the 64bit lite release.
Step 2 - Connect via SSH to the Raspberry Pi (RPi)
Once installed, connect your RPi to your home network, wait for it to boot, and then SSH in to begin configuring.
A good guide for this step is again available from the RPi website - here
Step 3 - Base Configuration
Adjust RAM Allocation for GPU to 16Mb
The display output on the RPi will not be used, so lets claim some extra RAM back for the system to use.
sudo raspi-config
Navigate -
- Performance Options-> GPU Memory
- Change to '16'
- Back
Rename System
This is basically to allow us to easily identify the device on the network, through its hostname.
in same raspi-config as previous step
- System Options
- Hostname
- Type in new hostname
- Finish
Step 4 - Install & Configure Log2RAM
Log2RAM is a storage solution that allocates a small % of your physical RAM as RAM Cache, and uses it to store log data from the system, flushing to disk on a regular schedule.
This is important to have in place where the OS partition is on a storage device that has to do wear leveling, so SSDs & SDs.
On a RPi, its doubly important as MicroSD's do not have the endurance to have sustained log writing to the disk for long periods without evantually killing the MicroSD.
Install Log2RAM
echo "deb [signed-by=/usr/share/keyrings/azlux-archive-keyring.gpg] http://packages.azlux.fr/debian/ bullseye main" | sudo tee /etc/apt/sources.list.d/azlux.list

sudo wget -O /usr/share/keyrings/azlux-archive-keyring.gpg  https://azlux.fr/repo.gpg

sudo apt update && sudo apt install log2ram
Configure Log2RAM
sudo nano /etc/log2ram.conf
- change 'SIZE' variable (line 8) to 128M
- ctrl+o
- ctrl+x
Step 5 - Configure 'Swappiness'
Edit config file
sudo nano /etc/sysctl.conf
Add to the bottom of the file -
vm.swappiness=0
Save and exit -
ctrl+o
ctrl+x
Now reboot -
sudo reboot
Step 6 - Configure the external storage device
We now need to configure the storage device that will actually store the backups.
Create Mount Points
sudo mkdir /mnt/usb_backup
Create Disk Partition
*get disk name*
sudo fdisk -l
*/dev/sda*
sudo fdisk /dev/sda
* create new partition table = g*
* create new partition = n*
* partition number = press enter 3x
* confirm & exit = w*
Format Partition
sudo mkfs.ext4 /dev/sda1
Do a test mount
Get the name of the disk -
lsblk -fp
Do a test mount -
sudo mount -t ext4 /dev/sda1 /mnt/usb_backup
Remove the test mount -
sudo umount /mnt/usb_backup
Setup the disk/partition to mount on system boot
Backup old fstab -
sudo cp /etc/fstab /etc/fstab.old
Get Partition UUID -
sudo blkid
Note down the partition UUID
Edit fstab -
sudo nano /etc/fstab
Add the below, replacing UUID with the partition UUID from the above step -
PARTUUID=XXXXXXXXXXXX /mnt/usb_backup ext4 defaults,auto,users,rw,nofail 0 0
Test mount path works with fstab entry -
sudo mount -a
Browse to mount path and see if you can see 'lost + found' within the mount folder.
If so, it mounted fine and should work on reboots.
If successfully mounted without error, continue the steps to allow it to automount on boot.
If it does not, do not continue, otherwise your system will not boot!
Step 7 - Network Share Configuration
Whilst optional, it is recommended to complete this. If the connection to the backup process is broken, this will allow you to directly access the raw compressed files without jumping through hoops.
Install SMB & tools
sudo apt install samba samba-common-bin -y
Create user for remote access to share
sudo adduser backupuser
Create share
Set base directory permissions
sudo chmod -R 777 /mnt/usb_backup
Backup config and edit config file
sudo cp -p /etc/samba/smb.conf /etc/samba/smb.conf.old
sudo nano /etc/samba/smb.conf
Add config
Scroll to the bottom, then add the following -
[Backup]
comment=Backup Share Directory
path=/mnt/usb_backup
browseable=no
guest ok=no
public=no
read only=no
writable=yes
create mask=0777
force create mode=0777
directory mask=0777
force directory mode=02777
force user=backupuser
Restart SMB
sudo systemctl restart smbd
Create password on share for user
sudo smbpasswd -a backupuser
Change folder permissions for user to allow read/write
sudo chown -R backupuser /mnt/usb_backup
Test share
Connect to \IP_Address\Backup, enter the username and password you created, then create a test file.
If successful, you should have no issues creating the file. If not, go back and check you followed every step
Step 8 - WireGuard Install & Configuration
This section assumes you have WireGuard setup on your local LAN, and have the ability to export config files (or copy/paste them).
We now need to configure WireGuard on the RPi to do an automatic VPN connection back to your home network, and make sure its kept-alive.
Install WireGuard
sudo apt install wireguard
Create configuration file
sudo nano /etc/wireguard/Home-WG.conf
Add the output of the config file from the wireguard server
Then, add the following to keep the connection alive, to the bottom of the config -
PersistentKeepalive = 30
Save and exit.
ctrl+o
ctrl+x
Add Wireguard Service to SystemD
sudo systemctl enable [email protected]
sudo systemctl daemon-reload
Start Service
sudo systemctl start wg-quick@Home-WG
Reboot to test connection
sudo reboot
Check connection is active
You can check this from both the WireGuard server, and locally on the system -
sudo wg show
Specifically, look at the 'latest handshake' time.
If its within the last few minutes since boot, you are good to go!
Step 9 - Misc Tools to install (optional)
Entirely optional, but highly recommended -
sudo apt install traceroute dirmngr iotop iperf git
Install RPi-Monitor
sudo apt-key adv --recv-keys --keyserver keyserver.ubuntu.com 2C0D3C0F
sudo wget http://goo.gl/vewCLL -O /etc/apt/sources.list.d/rpimonitor.list
sudo apt update
sudo apt install rpimonitor
sudo /etc/init.d/rpimonitor update
sudo /etc/init.d/rpimonitor install_auto_package_status_update
You should now be able to access RPi-Monitor on the following URL: http://IP_Address:8888
RPi-Monitor is a lightweight PHP monitoring app, showing network traffic, disk usage, temperatures, etc.
Step 10 - Duplicati
Now we have the RPi setup and connecting to our home network, we now need to configure the backup service (Duplicati) to schedule backups to the RPi over the VPN connection.
You dont specifically need to do this on Unraid, you can use any install of Duplicati, but for the purposes of this, we'll be going over configuration on Unraid.
Setting up the Dupliacti Container
Go to the community applications menu in Unraid (Apps).

In the search box on the right, type in "Duplicati", and select the one listed as using the "linuxserver's" repository.
Click the download icon (bottom left)
You will be taken the the container setup screen -
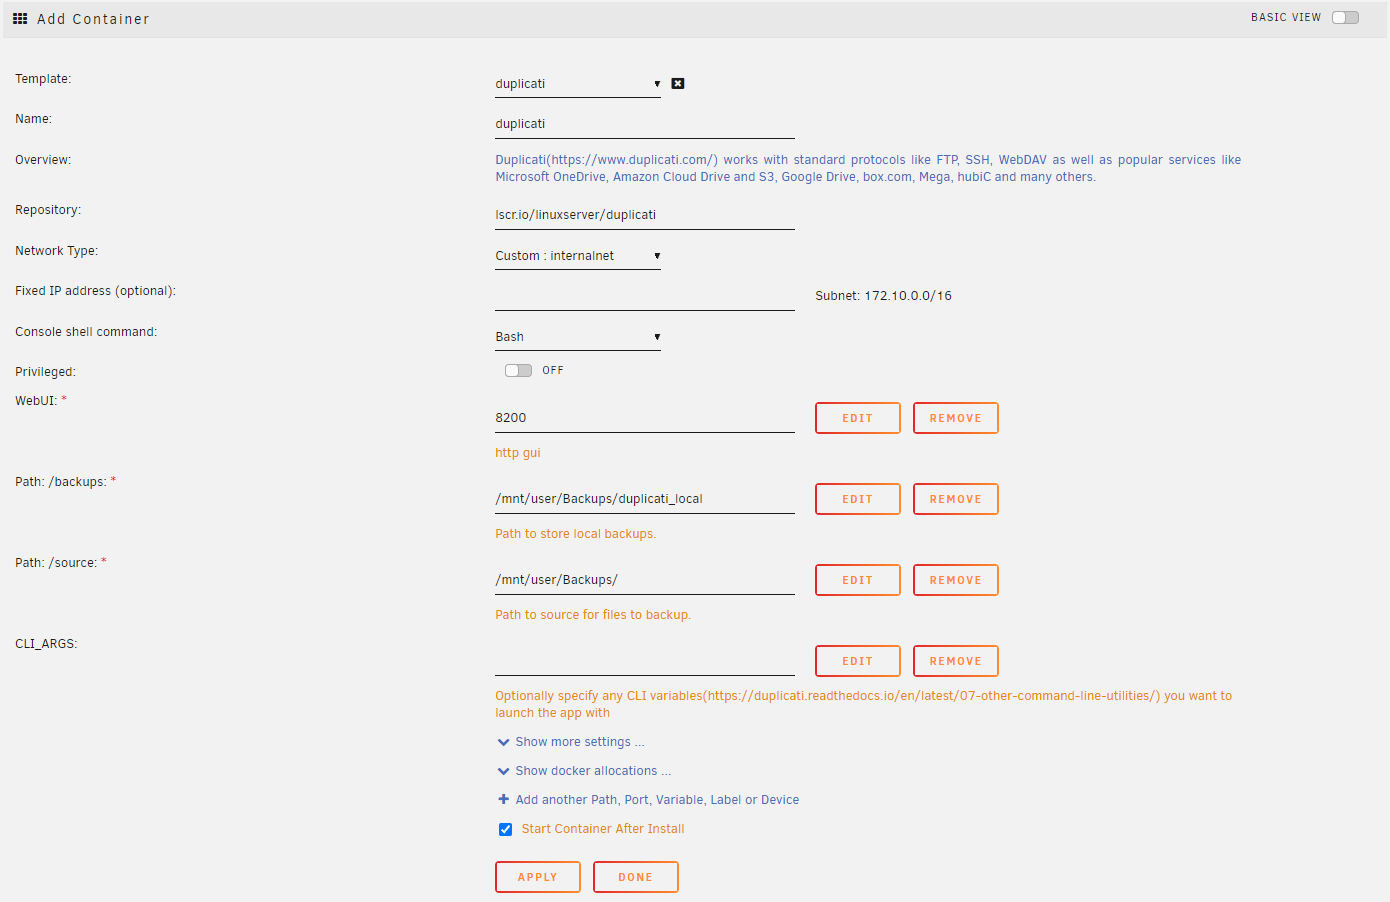
On here we need to configure a few key environment variables -
| Variable | Set to | Why |
|---|---|---|
| Network Type | Your custom docker network (if you have one set) | This will allow your other containers on the same network to do container name lookups |
| WebUI | A unique port number | Many services by default use the same port numbers, pick something unique thats not already in use |
| Path: /backups | Where you want Duplicati to restore to | |
| Path: /source | The root directory of what you want Duplicati to be able to backup |
At this point, you can click 'Apply' to start the container.
Once started, go to the docker tab, find the Duplicati container, click its icon, and click 'WebUI'.
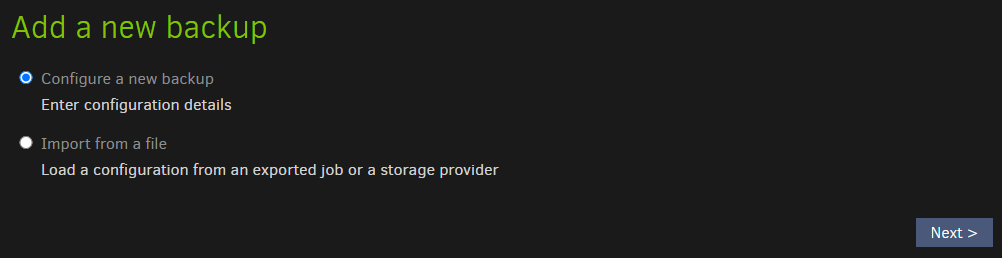
Configuring Duplicati
We now need to setup Duplicati to backup your data.
On the left hand menu, click 'add backup'

Click 'Configure a new backup', then "next".
Give it a name, description and press 'generate' to generate an AES-256 Encryption Key. Then press "next".
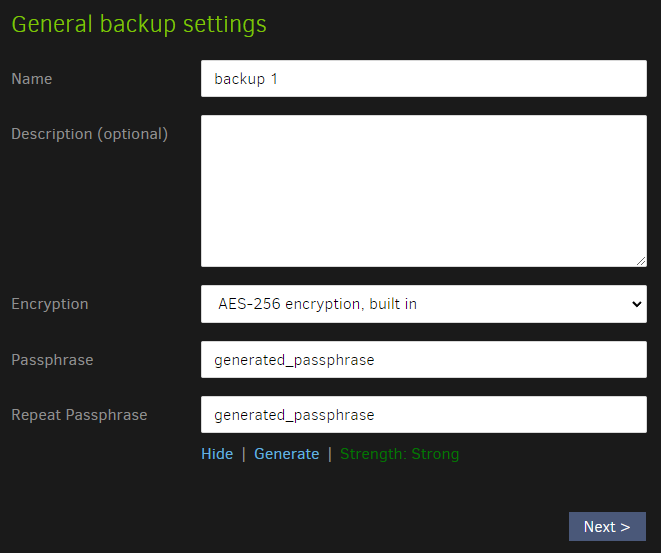
This is important as it will ensure that your data will remain safe, even if others get access to the RAW files.
Change Storage Type to ""SFTP (SSH)""
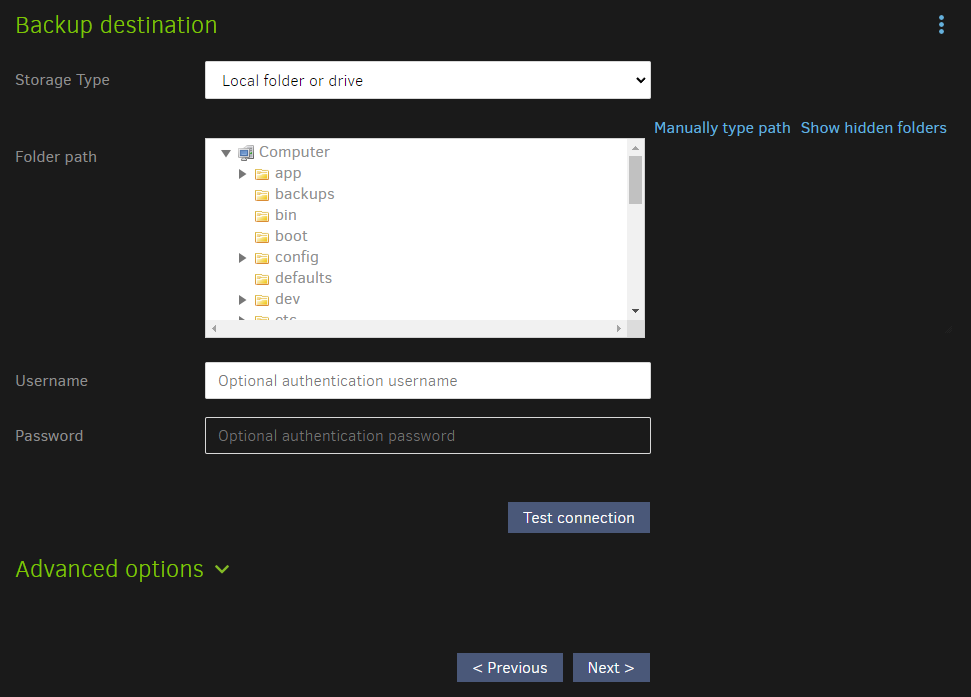
Now we can enter the connection parameters to allow Duplicati to connect to the RPi.
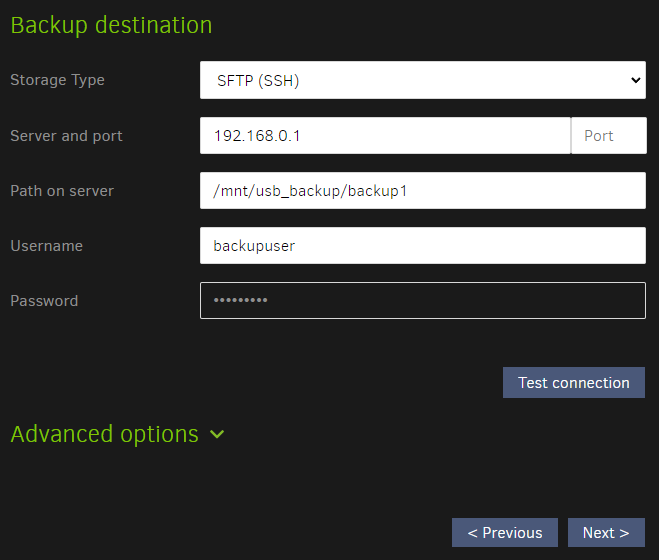
Enter your username and password that you setup in the previous steps, enter the VPN IP of the RPi, and port 22.
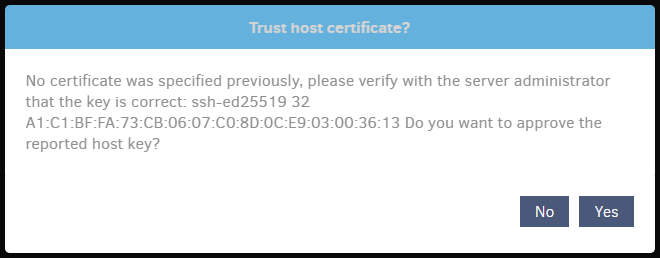
Press "test", "Yes", "next".
Now we need to select 'what' to backup.
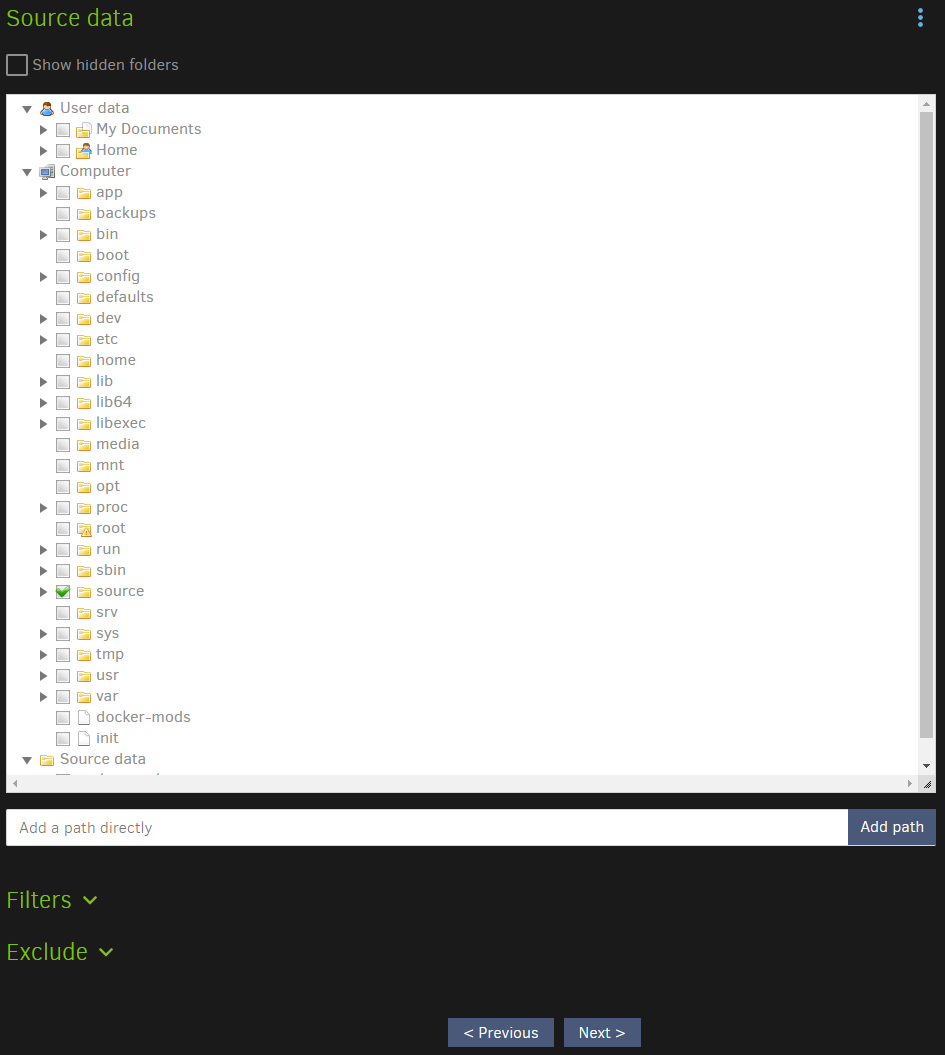
Browse to the /source folder under 'computer' and tick the folders you want to include in the backup.
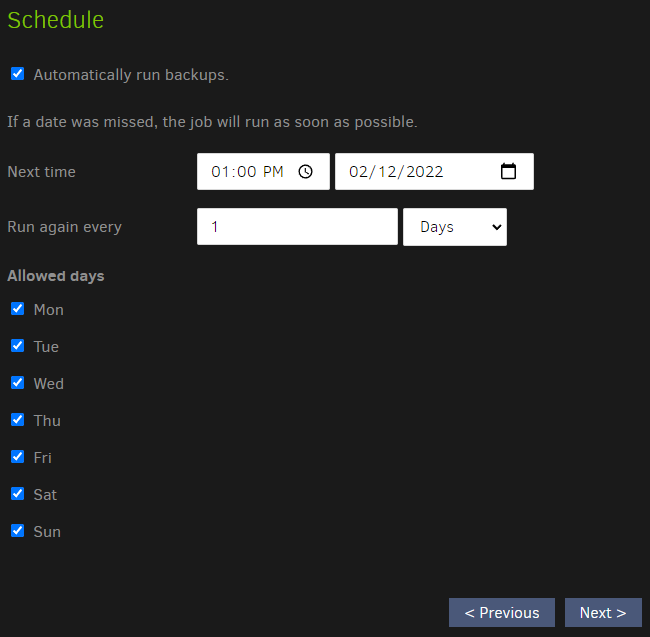
Now we need to set the schedule.
For your initial schedule, I recommend turning the scheduler off, testing a manual run, followed by a second, to get a rough idea of the max & average backup times, then go back to this screen (through the job edit function) to configure the backup schedule accordingly.
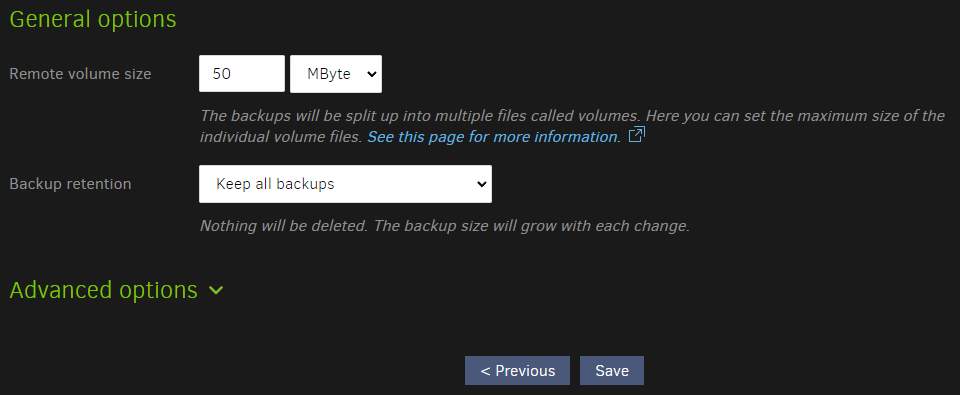
Now we set additional options, such as copies to keep.
This is entire upto you, however its worth keeping in mind that this solution is for emergencies, not day-to-day restorations, so infinite copies should not be needed.
Press "Save" and you are done.
Your system will now backup as per your schedule, and expanding the backup operations under "Home" will allow you to see status, edit the configuration, view logs, etc.

Conclusion
Assuming everything has worked as intended, you now have a remote backup device/service that will, on your set schedule, backup incremental backups to your RPi over a VPN connection.
This device can be placed anywhere with an internet connection, on either Wi-Fi or Ethernet (preferably Ethernet).
You should not need to reconfigure things if you move it somewhere else, either.