Network UPS Tools
Network UPS Tools, or 'Nut', is a Open Source UPS monitoring tool, that has the ability to interface with a wide variety of different UPS & power supply brands, across several different operating system types. It is hardware and OS agnostic in nature, which makes it great to deploy on network/s that have a variety of different OS's.
What is a UPS?
A UPS, Uninterruptible Power Supply, is a power augmentation system for electric devices that literally provides a battery to make up for drops in the electrical supply.
They function primarily for ensuring that devices don't just 'shutdown' unsafely, and thus prevent data loss and corruption, but many as a by-product also help clean up the power input to the device/s in question.
They are a sound investment to any IT setup and a must for anything that has to have 24/7/365 uptime.
Pre-Req's
- A UPS with a host communication port
- Somewhere to host the NUT server
Overview
The idea here is that we will deploy NUT server on a Raspberry Pi Zero W2, with Ethernet HAT, and have that act as the NUT server, feeding the monitoring/metrics to other devices, such as virtualization hosts.
UPS Hardware Considerations
The decision behind a UPS device comes down to one primary fact, and one inescapable factor...
Primarily, you need to spec the UPS according to the expected load upon it, and the runtime you want. Assuming you buy from one of the big companies, they all provide rough calculators to get you started -
Next, the inescapable truth - A UPS without a communication port, usually USB nowadays, is next to pointless for systems that need to be on 24/7/365. Otherwise all that they would give you is protection to minor outages (minutes) and would then still have an unclean shutdown and the associated risks.
As a rule of thumb here, if it needs to be on 24/7/365 - get one with a communication port.
If its just your home PC, a normal UPS is fine, and it'll be on you to safely shutdown your computer when you see the lights go out.
NUT Basic Architecture Concept
This bit i feel is important, as whilst NUT has a lot of documentation, guides, etc. - almost none of it actually goes over some core concepts of its architecture.
The key thing to remember here is that the server has zero control over a clients decision of when and how to shutdown.
Literally that simple.
There are hints and bits of information out there that infer certain aspects of that control, but ultimately the client makes the decision. The server software just monitors and proxies data to the client.
NUT Server
Physically connect your UPS
First, connect your UPS to the USB port of your server and power it on.
Install NUT
Next we need to install NUT itself on the server.
To do this, open a terminal session (either local or remote SSH), and run -
sudo apt install nut-client nut-server
Scan for UPS
Now we need to scan for the UPS and grab some variables from the output -
sudo nut-scanner -U
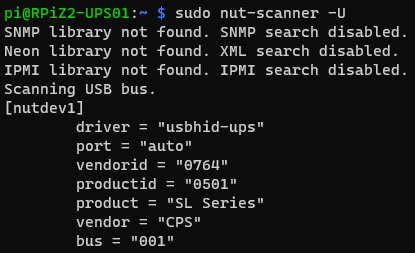
From this output, make note of vendorid, productid, driver, port, product, vendor & bus - or copy to memory (ctrl+c)...
Config files
Browse to /etc/nut, and create the follow files and contents with your text editor of choice.
Example -
sudo nano filename.conf
nut.conf
MODE=netserver
This instructs NUT to function in 'server' mode.
ups.conf
# Poll UPS/s every x Seconds.
pollinterval = 1

# Retry failed driver starts, x times
maxretry = 3

# CyberPower 750VA SL750U
[ups01a]
    driver = "usbhid-ups"
    port = "auto"
    vendorid = "0764"
    productid = "0501"
    product = "SL Series"
    vendor = "CPS"
    bus = "001"
    desc = "Server Room - CyberPower 750VA SL750U"
This is what tells NUT about your UPS, replace various values with the values you got from the previous step, or copy and paste the output if you went that route.
The desc us a description you can give, i recommend the manufacture/model/location of the UPS.
The square brackets is the identifier we will be using elsewhere with NUT & the clients.
upsd.conf
local host

LISTEN 127.0.0.1 3493
all interface

LISTEN 0.0.0.0 3493
upsd.users
# admin user (used for upscmd)
[admin]
        password = --PASSWORD--
        actions = SET
        instcmds = ALL

# client user (used for remote clients)
[client]
        password = --PASSWORD--
        upsmon = slave
This file creates the various user types that NUT uses.
You can split this up and create users for each remote system if you wish, however in this example, we're going to keep it simple.
Replace the --password-- value to set the passwords for each user (admin & client respectively).
upsmon.conf
MONITOR ups01a@localhost 1 admin --password-- master
This is what tells the local system, the server, how to connect to the NUT server itself, to allow both administration from CLI, and to allow said system to also shutdown based on the UPS too.
hosts.conf
MONITOR ups01a@localhost "CyberPower 750VA SL750U - Under Stairs"
Similar function to the previous config, but is specifically for the Web GUI...
Add USB Subsystem rules & permissions
Edit the file 99-nut-ups.rules and add the below code block, editing the idVendor & idProduct with the values previously gotten above.
sudo nano /etc/udev/rules.d/99-nut-ups.rules
SUBSYSTEM!="usb", GOTO="nut-usbups_rules_end"

# CyberPower 750VA SL750U
ACTION=="add|change", SUBSYSTEM=="usb|usb_device", SUBSYSTEMS=="usb|usb_device", ATTR{idVendor}=="0764", ATTR{idProduct}=="0501", MODE="664", GROUP="nut", RUN+=">
LABEL="nut-usbups_rules_end"
Restart services
To apply the config/s, we now need to apply the config to the NUT services.
sudo service nut-server restart
sudo service nut-client restart
sudo systemctl restart nut-monitor
sudo upsdrvctl stop
sudo upsdrvctl start
Install WebGUI
To make it easier to remotely access UPS stats, we can install a basic WebGUI.
First, install the additional packages needed.
sudo apt install apache2 nut-cgi
Now we create a 'config' file and enter some specific text.
sudo nano /etc/nut/upsset.conf
I_HAVE_SECURED_MY_CGI_DIRECTORY
Add the apache modules for CGI.
sudo a2enmod cgi
Restart Apache -
sudo systemctl restart apache2
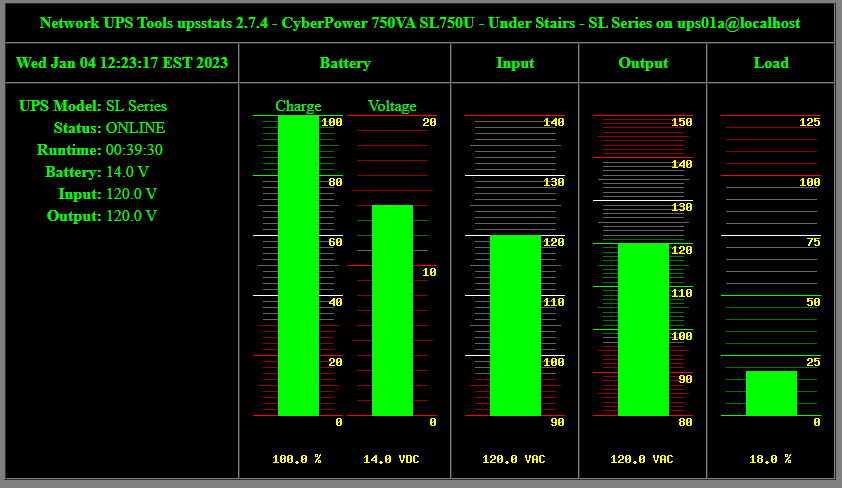
Assuming everything was setup correctly and is working, you should now be able to verify both the servers connection to the UPS, its status & that the WebGUI works, by browsing to the servers IP in a browser.
http://ip_address/cgi-bin/nut/upsstats.cgi

NUT Client
Next we need to configure some clients to react to the power outages/status's from NUT server.
Install NUT
First, install NUT on the client/s. To do this, open a terminal session (either local or remote SSH), and run -
sudo apt install nut-client
Config files
Similar to NUT server, browse to /etc/nut, and create the follow files and contents with your text editor of choice.
Example -
sudo nano filename.conf
nut.conf
MODE=netclient
This tells NUT to function in 'client' mode.
ups.conf
FSD 50
This tells the NUT client at what battery percentage to begin shutdown at.
In this example, 50%.
upsmon.conf
# Run as user
RUN_AS_USER root

# Connection to NUT Server
MONITOR name_of_ups@ip_or_dns_of_server 1 --client_username-- --password-- slave

# Minimum Power Supplies (as in, minimum UPSs online)
MINSUPPLIES 1

# Shutdown command
SHUTDOWNCMD "/sbin/shutdown -h +0"

# How often to poll the remote UPS for data, in seconds
POLLFREQ 15

# How often to poll the remote UPS for data, when the UPS is on battery, in seconds
POLLFREQALERT 5

# Other Configs - defaults from example config
HOSTSYNC 15
POWERDOWNFLAG /etc/killpower

# Replace Battery Warning, seconds. 43200 seconds=12 hours
RBWARNTIME 43200
NOCOMMWARNTIME 300

# Interval to wait before declaring a stale ups "dead"
# Note, should be ideally 3x the highest value of pollfreq and pollfreqalert
DEADTIME 45

# Add shutdown delay
FINALDELAY 120

# Notification Messages
NOTIFYMSG ONLINE    "UPS %s on line power"
NOTIFYMSG ONBATT    "UPS %s on battery"
NOTIFYMSG LOWBATT   "UPS %s battery is low"
NOTIFYMSG FSD       "UPS %s: forced shutdown in progress"
NOTIFYMSG COMMOK    "Communications with UPS %s established"
NOTIFYMSG COMMBAD   "Communications with UPS %s lost"
NOTIFYMSG SHUTDOWN  "Auto logout and shutdown proceeding"
NOTIFYMSG REPLBATT  "UPS %s battery needs to be replaced"
NOTIFYMSG NOCOMM    "UPS %s is unavailable"
NOTIFYMSG NOPARENT  "upsmon parent process died - shutdown impossible"

# Notification Actions
NOTIFYFLAG ONLINE   SYSLOG+WALL+EXEC
NOTIFYFLAG ONBATT   SYSLOG+WALL+EXEC
NOTIFYFLAG LOWBATT  SYSLOG+WALL
NOTIFYFLAG FSD      SYSLOG+WALL+EXEC
NOTIFYFLAG COMMOK   SYSLOG+WALL+EXEC
NOTIFYFLAG COMMBAD  SYSLOG+WALL+EXEC
NOTIFYFLAG SHUTDOWN SYSLOG+WALL+EXEC
NOTIFYFLAG REPLBATT SYSLOG+WALL
NOTIFYFLAG NOCOMM   SYSLOG+WALL+EXEC
NOTIFYFLAG NOPARENT SYSLOG+WALL

# Notify Command
# Runs script specified when EXEC is used as a notification action
#NOTIFYCMD
This is the main file that dictates what to do in specific scenarios.
Such as how often to poll the server, whats considered a dead host, what the shutdown command should be, what flags/messages to use and what to do when the status hits each of them.
You can leave all of this as it is, it doesn't need editing to work 'as is'.
The last section, is where you can specify what 'EXEC' does, as in, excute a specific command in addition too.
Restart services
To apply the config/s, we now need to apply the config to the NUT services.
sudo service nut-client restart
sudo systemctl restart nut-monitor
Things to keep in mind
Why we arn't applying the client config to the server
With the config above, the NUT server will shutdown only when the power actually cuts.
This may be perfectly fine for you, or you could be 'deep freezing' the server like i do so that there are no writes in process.
Alternativly, you can add the NUT client config line FSD 50 for shutdown % to the server ups.conf too, and have it shutdown last (which it should be, for the other clients to get their UPS data)
Checking runtime
This is an important step to help understand what sort of runtime and at what percentages different times apply to your UPS.
Due to the accuracy of most UPS's being way off what is reported in the tools we have, this is very much an exercise of a notepad and stop watch.
You have two ways you can achieve this, but both will require you to keep an eye on it -
- Run a deep self-check -
sudo upscmd <ups-name> test.battery.start.deep. - Do a live test (unplug it) - i'd recommend this route if you can, as i found my UPS actually ran an extra 5 minutes beyond 0%, likely to give things a bit of a buffer to shutdown with.
Either way, you can help monitor the battery percentage with either the WebGUI, or in near-realtime on the CLI by runningwatch upsc <ups-name>and keeping an eye on thebattery.chargestat near the top of the output.
Planning for shutdown times & adjusting variables
Your systems take time to shutdown. Its not instant.
If you are running a hypervisor, docker or kubernetes host, etc, then it can often take 2-5 minutes to safely shut down said system.
Make sure you are planning this time period in, otherwise you are going to start having issues with dataloss from an unclean shutdown.
Staggered shutdowns
This is a useful technique to help increase the uptime of your key services.
By staggering the shutdown and shutting down less essential systems first, you can extend the runtime of your more essential systems by as long as possible.
For example, lets say you have a three node kubernetes cluster, you can have the third node shutdown first at 75%. The second at 50%, and the first at 20-25%.
This would allow your running services to keep their load balanced/HA status and running, whilst reducing the electrical load on the UPS itself.
Useful Commands
Turn off the beeper (device driver dependant)
sudo upscmd ups01a beeper.disable
Do a quick test
sudo upscmd ups01a test.battery.start.quick
Do a deep test (discharged the battery to zero, whilst keeping the power on)
sudo upscmd ups01a test.battery.start.deep
Show what variables can be set on your specific UPS (run on server)
upscmd -l ups01a@localhost
Shows configured variables/stats
upsc ups01a
Conclusion
At this point you should have a fully functional UPS monitoring & automated shutdown system setup.
From here you can customize further, apply metrics, etc, but ultimately, you should be a little safer than before from power outages, and the damage they can cause from just shutting down.