Storage
Next we need to setup some storage & storage defaults, so when we deploy some containers/pods we can store persistent data.
For this, we are going to setup two types, local 'Longhorn' storage, and remote NFS.
What is Longhorn?
Longhorn is a Kubernetes native distributed storage platform.
It consolidates storage across multiple nodes into one pool, and distributes the data that comes from your storage claims across the nodes for resiliency and high-availability.
Out of all the storage technologies we can use to provide persistent storage for your deployments/pods, Longhorn is by far the easiest way to get started.
Why NFS?
NFS is one of the oldest networks storage protocols around, but its also one of the most reliable, and for Linux based nodes, one of the easiest to get up and running quickly.
We are using it in this example to provide a second storage option to the cluster, thus allowing high-speed local storage, and remote slower storage for applications/data that either need mass-storage, or arn't sensitive to storage latency.
Step 1 - Configure External Disk
We now need to configure the storage device that will be used by Longhorn.
You will need to do this on each node
Create Mount Points
First, SSHing into the nodes, create a directory we can use for mounting.
sudo mkdir /mnt/usb_storage01
Create Disk Partition
(assumes no existing partition layout) - skip to the next section if there is an existing partition
Plug your storage devices into the nodes.
Next, we need to get the device name.
sudo fdisk -l
Make note of the name of your disk, it will be something similar to /dev/sda.
The below steps are a destructive action, you will lose any existing data on the storage device.
Now we need to partition the disk. Enter the /dev/sdX path you got before into the command below.
sudo fdisk /dev/sda
Next,
- Type
gto create a new partition table. - Type
nto create a new partition. - Press
enterthree times to accept the defaults. - Type
wto confirm and exit fdisk.
Format Partition
Start here if you already have partitions on your device
The below steps are a destructive action, you will lose any existing data on the storage device.
We now need to format the partition, replacing the /dev/sdX with the name of storage device you got previously, and adding a 1 to the end as we are only using 1 partition on the device, so this will be the first partition on it.
sudo mkfs.ext4 /dev/sda1
Do a test mount
Do a test mount of your drive
sudo mount -t ext4 /dev/sda1 /mnt/usb_storage01
Assuming there were no errors, you should be able to browse to the mount path and create a test file, if you want to double confirm.
We now need to remove the test mount -
sudo umount /mnt/usb_backup
Setup the disk/partition to mount on system boot
Next we need to backup the old fstab file - this is what tells the system what to mount on boot.
sudo cp /etc/fstab /etc/fstab.old
Now get the Partition UUID
sudo blkid
Note down the partition UUID
Edit fstab -
sudo nano /etc/fstab
Add the below, replacing XXXX with the partition UUID from the previous step -
PARTUUID=XXXX /mnt/usb_storage_32g ext4 defaults,auto,users,rw,nofail 0 0
Now we do another test mount, using the settings we just added to fstab.
sudo mount -a
Browse to mount path and see if you can see 'lost + found' within the mount folder.
If so, it mounted fine and should work on reboots.
If successfully mounted without error, continue the steps to allow it to automount on boot.
If it does not, do not continue, otherwise your system will not boot!
Step 2 - Install Longhorn
On your admin workstation, run the following commands to install the Helm repo ready for Longhorn.
Make sure you replace the default path at the end with your mount path, if it is different to the examples on this page.
helm repo add longhorn https://charts.longhorn.io
helm repo update
helm install longhorn longhorn/longhorn --namespace longhorn-system --create-namespace --set defaultSettings.defaultDataPath="/mnt/usb_storage01"
Once ran/complete, this will install Longhorn into its own namespace, called 'longhorn-system'.
Reclaim policies
A reclaim policy is a policy that applies to storage-class in Kubernetes (and thus a PVC) that dictates from a cluster and storage point of view, what to do with Persistent Volume Claims once the volume becomes decoupled from a deployment, and thus, never used again.
By default, most storage classes set this to 'Delete', as in, when no longer in use, delete the volume and its data.
There are additional policy settings you can set here, such as Retain (don't delete, needs manual deletion), or Recycle (keep the claim, format it fresh).
This is entirely down to your preferences & usage case what policy you set.
As your three options and routes forward -
- If you are doing a new install nd want to change to retain or recycle, add
--set persistence.reclaimPolicy="Retain"to the end of the helm install command above. - If you have an existing install and want to change, use the command
kubectl -n longhorn-system edit cm longhorn-storageclass, then edit the variablereclaimPolicyto read eitherRetainorRecycle.
Further reading
Configure Longhorn Dashboard to present through Traefik
On your admin workstation, create a yaml file called longhorn_service.yaml with the following contents -
---
kind: Service
apiVersion: v1
metadata:
  name: longhorn-int-service
  namespace: longhorn-system
spec:
  type: ClusterIP
  selector:
    app: longhorn-ui
  ports:
  - name: http
    port: 8000
    protocol: TCP
    targetPort: 8000
Next, create one called longhorn_ingress_traefik.yaml with the following contents -
apiVersion: networking.k8s.io/v1
kind: Ingress
metadata:
  name: longhorn-ingress
  namespace: longhorn-system
  annotations:
    kubernetes.io/ingress.class: traefik
spec:
  rules:
  - host: "longhorn.domain.com"
    http:
      paths:
      - path: /
        pathType: Prefix
        backend:
          service:
            name: longhorn-int-service
            port:
              number: 8000
Be sure to replace longhorn.domain.com with the subdomain of your choosing.
Lastly, apply both o f these configs -
kubectl apply -f longhorn_service.yaml
kubectl appyl -f longhorn_ingress_traefik.yaml
Make sure that the DNS record, on your local network or computer, points at the IP for Traefik.
You can get Traefiks IP with the command kubectl get svc -n kube-system | grep traefik.
Set Longhorn as default storage class
Next, we need to set Longhorn to use be the default storage class -
kubectl patch storageclass local-path -p '{"metadata": {"annotations":{"storageclass.kubernetes.io/is-default-class":"false"}}}'
Run kubectl get storageclass to confirm its been set as the default.
Configure Longhorn in GUI.
Open a web browser, and navigate to Longhorn with the domain name you setup above.
You will be presented with the Longhorn Dashboard.
We now need to make sure that the storage disks/nodes are configured correctly.
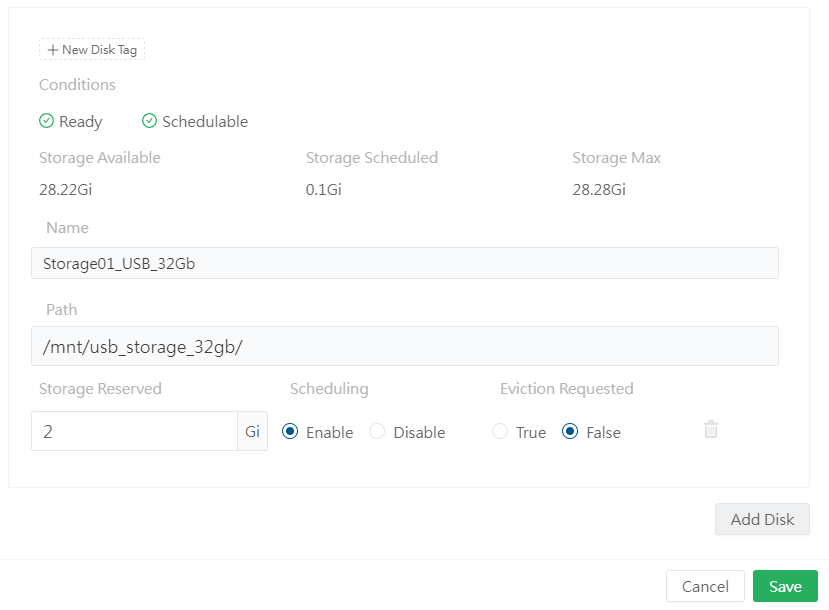
Click the 'Node' tab at the top.

On the right of one of your nodes, click the 3-line menu, then Edit node and disks.

Scroll down to the bottom, and -
- Check that the
Pathvariable shows your local path that was previously setup. - check that the
nameis something friendly for you to recognize. - Enable
scheduling. - Add a few Gb into the box for
Storage Reserved. This is entirely optional but i highly recommend it as full storage drives cause all manner of issues. Plus, on solid based storage (MicroSDs, USB Thumb Drives, SSD's), it gives a few Gb spare for background wear leveling.
ClickSave.
Click the 'Dashboard' tab at the top.
You should see in the middle and right chart both schedulable storage, and schedulable nodes.
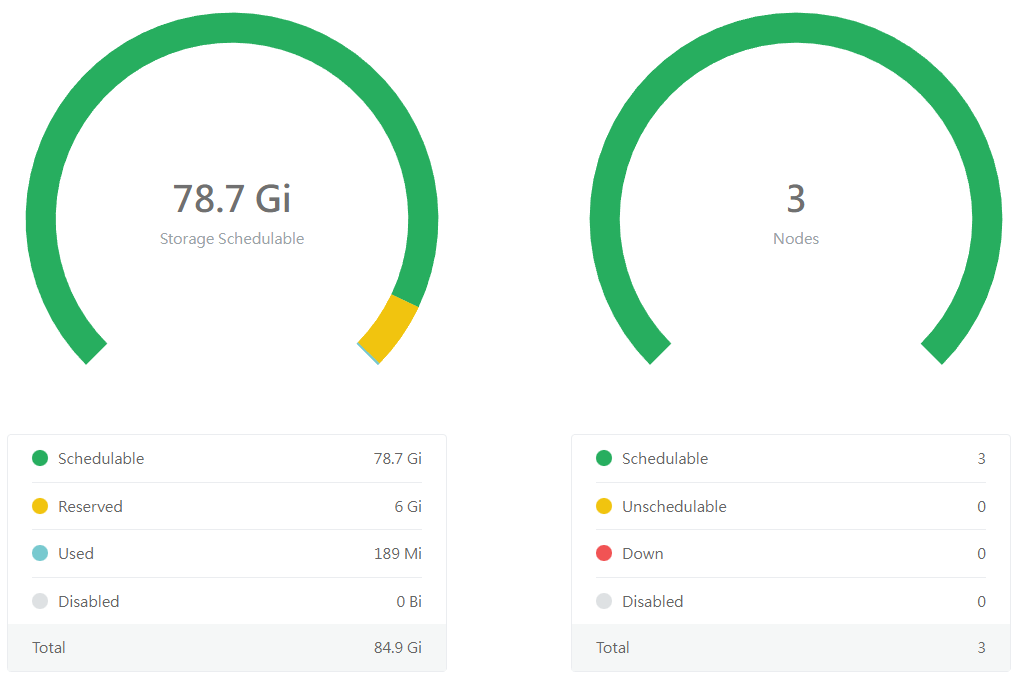
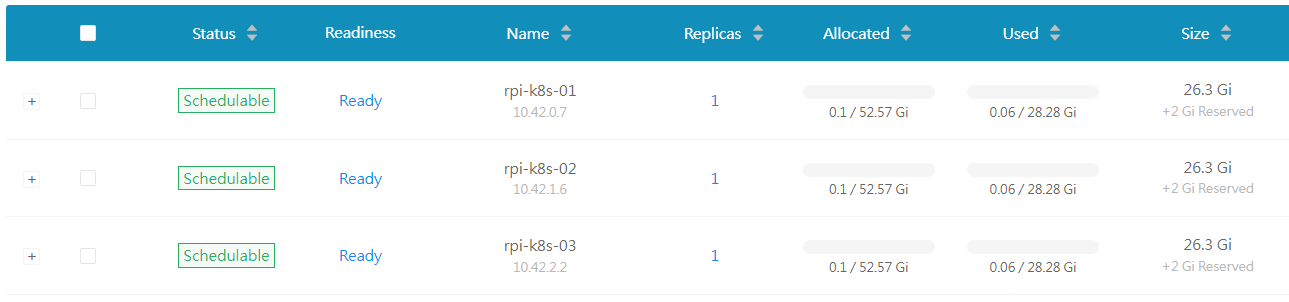
Along with from the Node menu, where you will be able to see all of your nodes, along with more storage metrics.
Create test PVC
Lets create a test PVC to confirm Longhorn is working correctly.
Create a file called test_pvc.yaml.
apiVersion: v1
kind: PersistentVolumeClaim
metadata:
  name: test-pvc
  namespace: default
spec:
  accessModes:
    - ReadWriteOnce
  storageClassName: longhorn
  resources:
    requests:
      storage: 1Gi
Apply it to your cluster -
kubectl apply -f test_pvc.yaml
Now describe it and check that the storage class in use is Longhorn.
kubectl describe pvc test-pvc
Next, browse to the longhorn GUI and see if you can see it in the interface summary -
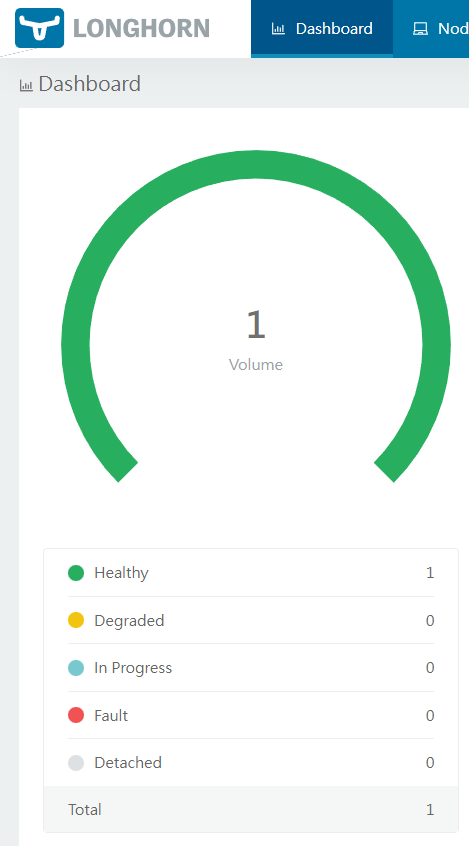
The volume summary will also show under the volume menu bar, showing more details too.

Finally, delete the test PVC.
kubectl delete -f test_pvc.yaml
Step 3 - Install NFS - Optional
Next we are going to install a NFS Storage Provider. As this is optional, this will need you to have a NFS server already setup with a working share.
On your admin workstation, run the following command to add the helm repo -
helm repo add nfs-subdir-external-provisioner https://kubernetes-sigs.github.io/nfs-subdir-external-provisioner/
Next, we need to install the provisioner -
helm install nfs-storage nfs-subdir-external-provisioner/nfs-subdir-external-provisioner --set nfs.server=storageserver --set nfs.path=/storage/path/to/share k8s-persistent --namespace nfs-storage --create-namespace
This will install a NFS Storage Provider to a namespace called 'nfs-storage'.
Test Claim
Lets create a test PVC to confirm NFS is working correctly.
Create a file called test_nfs_pvc.yaml.
kind: PersistentVolumeClaim
apiVersion: v1
metadata:
  name: test-claim
  labels:
    storage: nfs
spec:
  storageClassName: nfs-client
  accessModes:
    - ReadWriteMany
  resources:
    requests:
      storage: 100Mi
Now apply it to your cluster -
kubectl apply -f test_nfs_pvc.yaml
If you go to your NFS server, you should see a folder within your share.
Next, lets see if we can get a test file created.
Create a file called test_nfs_pod.yaml.
kind: Pod
apiVersion: v1
metadata:
  name: test-pod
  labels:
    storage: nfs
spec:
  containers:
  - name: test-pod
    image: busybox:stable
    command:
      - "/bin/sh"
    args:
      - "-c"
      - "touch /mnt/SUCCESS && exit 0 || exit 1"
    volumeMounts:
      - name: nfs-pvc
        mountPath: "/mnt"
  restartPolicy: "Never"
  volumes:
    - name: nfs-pvc
      persistentVolumeClaim:
        claimName: test-claim
Now apply it to your cluster -
kubectl apply -f test_nfs_pod.yaml
Now, if you view the same share from your storage server, you should see an empty file has been created called SUCCESS.
Delete the test PVC and test Pod -
kubectl delete -f test_nfs_pvc.yaml
kubectl delete -f test_nfs_pod.yaml
Congrats, your storage is now setup!
Next Step
Next, go to the next step, Logging.
Or,
Go back to the index page.