Cloudflare - Deploying a tunnel, with reverse proxy
In this guide, we are going to go over how to deploy a Cloudflare Tunnel, and have your applications you want to present to the outside world, be published through a reverse proxy.
Why?
Opening up ports to the outside world is bad. Its as simple as that.
Doesn't matter if it's routing between several firewalls and NATs, going through reverse proxies, etc. it's not a great security decision at the scale we are talking about here (home labs, self hosting, etc.) - it's not just not viable to expect a 'home user', even a 'pro-sumer' to be able to have visibility into threats enough to be able to protect their network as well as an enterprise does with their dedicated security teams and millions in hardware and software investment.
However, we can leverage these enterprise abilities, get some 'free' security benefits and speed things up with relativity little effort by using a combination of Open Source Software (Nginx) & some free tier offerings from one of the big companies, Cloudflare.
What are we using to achieve this?
At a basic level, we are using Nginx Proxy Manager as our reverse proxy (you can just as easily use others here, like Traefik), and a Cloudflare Tunnel.
Cloudflare Tunnel?
The easiest way to think of a Cloudflare tunnel is like a reverse-VPN.
You run a a service on your network that punches out of your local LAN like anything else, and connects to Cloudflare's global network.
This gives you an externally routable address that comes back into your network via Cloudflare's network, over the tunnel and into your reverse proxy - without exposing your home network to anything, or opening ports.
Why is this more secure than port forwarding?
Port forwarding opens up local ports on your local system.
To route to it you need to point a domain at your external IP address, meaning, you are exposing your home networks IP & associated details to the outside world.
Using Cloudflare Tunnels, you are not exposing anything about your home network at all. The 'outside world' only see's Cloudflare.
Now, this is where it gets interesting - by using Cloudflare's Tunnel service, you get to leverage, for free, their DDOS protection, usage of auto-renewing certificates, bot & spam protection, zero trust networking, web analytics, caching, enforcing of some common security aspects (like forced TLS 1.3), and most of all, their expertise and knowledge in proactive blocking and reporting of many threats. Its like having your own security team!
Pre-Req's
- A basic understanding of Nginx Proxy Manager - basic overview here.
- A Cloudflare Account
- A Cloudflare managed domain (nameservers, not necessarily registration)
Concepts to understand
Step 1 - Deploy Tunnel
Create new tunnel on Cloudflare Zero Trust Dashboard
Login to your Cloudflare Zero Trust Dashboard
Once logged in, on the left, expand access, then click "Tunnels"

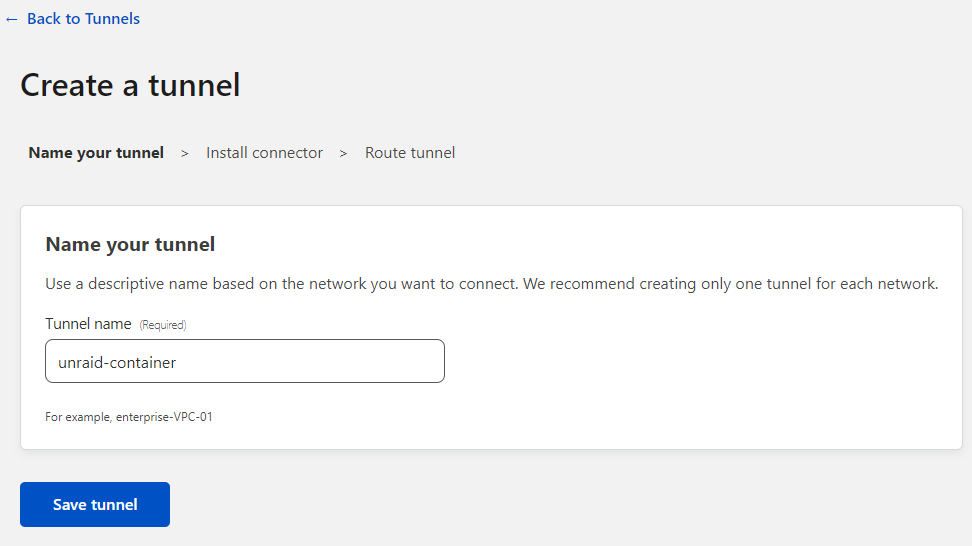
On the top right, click "Create a tunnel"

Give your tunnel a name, in this example, i am calling it unraid-tunnel, as its a tunnel, that i will be running on Unraid.
Then click Save tunnel at the bottom.
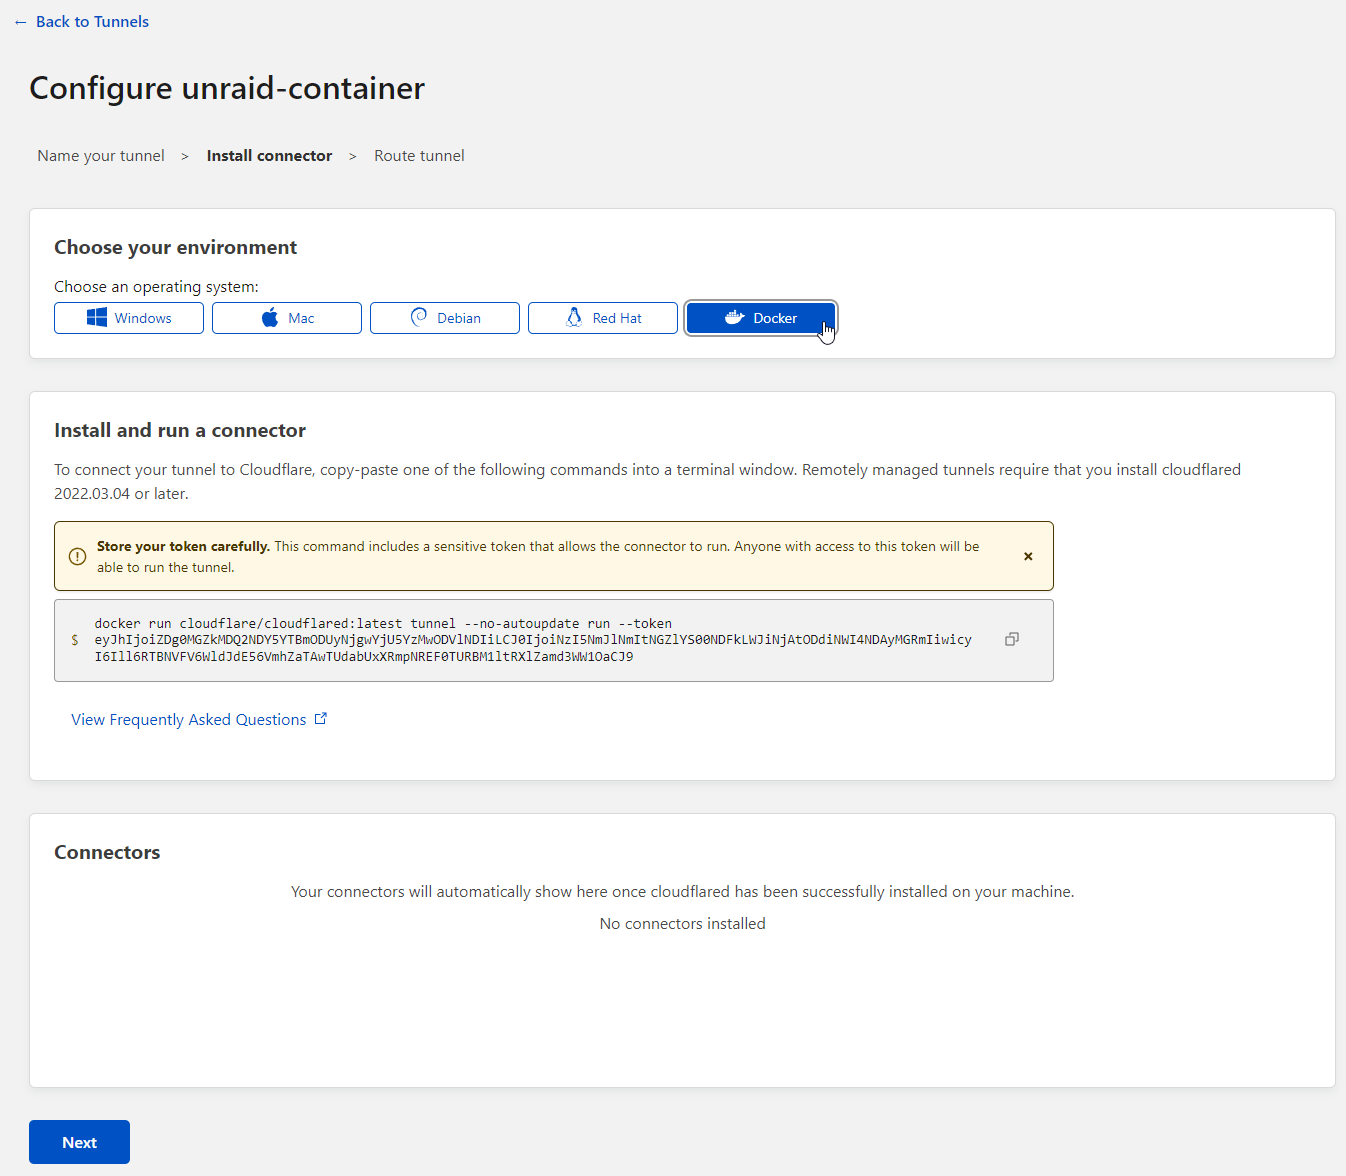
On this screen, under the Choose your environment section at the top, click Docker.
The area below, underneath Install and run a connector will change to show a docker run command.
Keep this page up, as will need the information from it.
Create tunnel container on Unraid
Login to your unraid GUI, and click Docker.

At the bottom, click ADD CONTAINER

On this screen, we are going to create a custom container for the Cloudflare Tunnel.
Begin entering these settings on the main configuration page.
| Setting | What to enter |
|---|---|
| Name | cloudflare_tunnel_2 |
| Repository | cloudflare/cloudflared:latest |
| Network Type | Your local docker network - in my case, 'proxynet' |
Now, click the toggle in the top right that says BASIC VIEW, and toggle it to ADVANCED VIEW

On this screen, we need to add some additional variables -
| Setting | What to enter |
|---|---|
| Docker Hub URL | https://hub.docker.com/r/cloudflare/cloudflared/ |
| Icon URL | https://raw.githubusercontent.com/aeleos/cloudflared/main/cloudflare-icon.png |
| Extra Parameters | see below |
For Extra Parameters, we need to take the output of the cloudflare wizard, everything past "tunnel", but removing '--no-run-autoupdate'.
Running containers on the latest rolling releases vs sticking with a known working release is a popular difference of opinion for both self-hosters and big organisations alike.
For this deployment, i am recommending 'latest' as the release tag as a home lab is not critical in nature. If something breaks due to a bad update, it can be diagnosed.
You should however change this based on your personal viewpoint & preference.
Example -
tunnel run --token ABC1234567890
Once information has been inputted, click APPLY at the bottom of the page.

You should see 'the command finished successfully!' at the bottom of the deploy page if it was successfully downloaded/deployed.
Click DONE
If you now switch back to the tab for Cloudflare, you should see your new tunnel with the status Connected.

Click Next at the bottom of the page to continue.
The next page is where we configure what we are routing and to where -
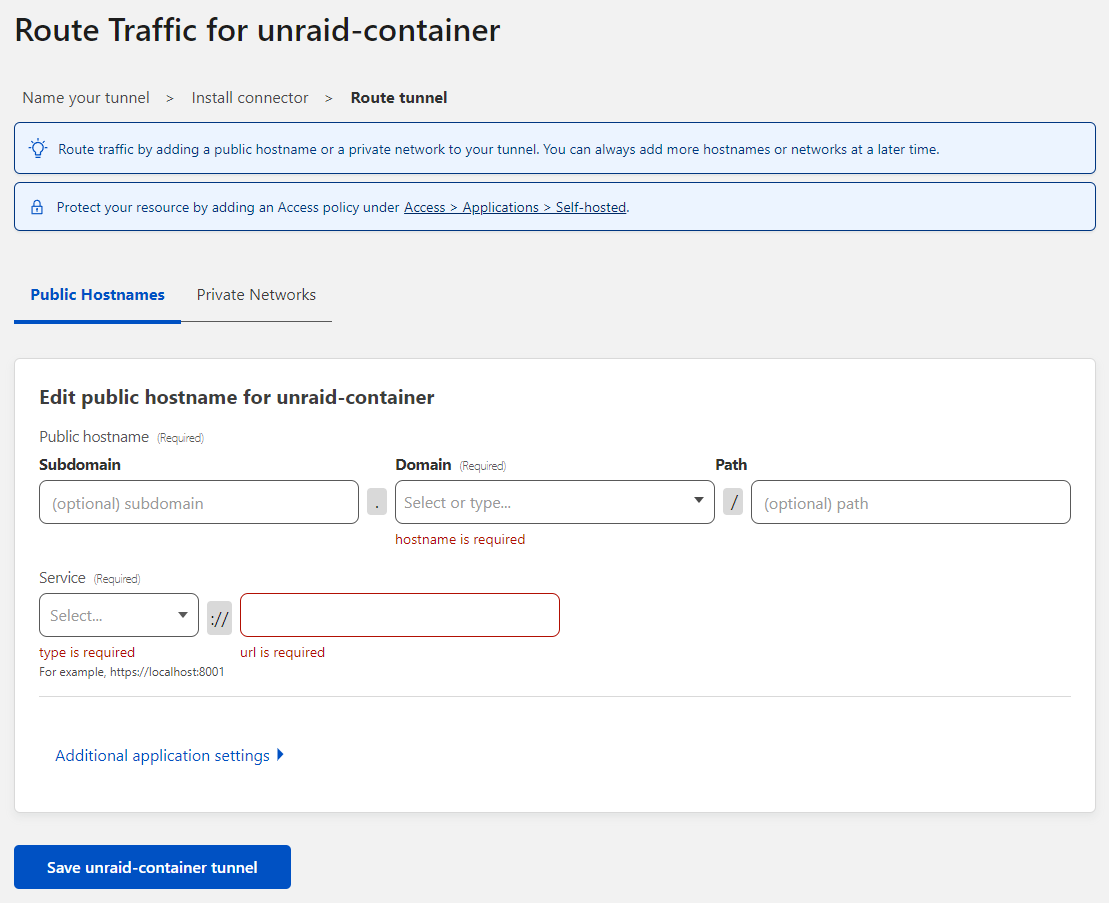
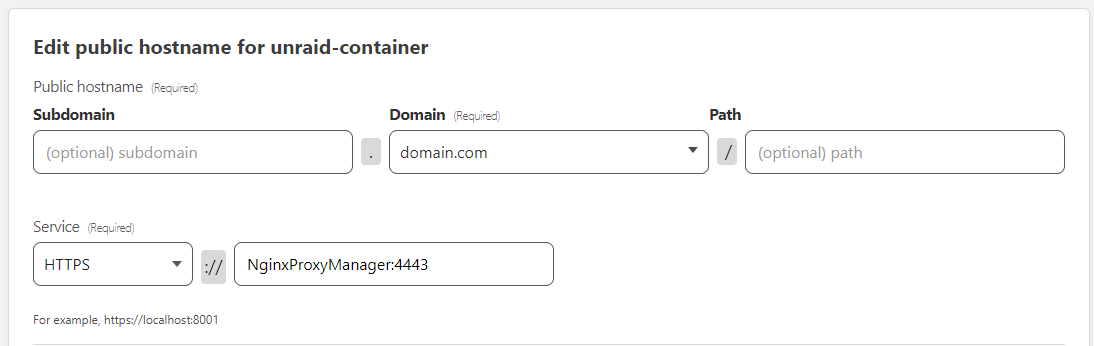
To pass everything that the tunnel receives to a proxy container (recommended), enter the following details -
| Setting | What to enter | Example |
|---|---|---|
| Subdomain | my-tunnel | n/a |
| Domain | Your domain name | domain.com |
| Path | Leave blank | n/a |
| Service Type | HTTPS | n/a |
| Service URL | containername:port | NginxProxyManager:4443 |
Click Save unraid-container tunnel
Create tunnel DNS record
At this point we need to create a tunnel DNS record to allow you to cross-reference other subdomains to, with CNAMEs.
In a basic configuration you would use your domain root @, however i recommend instead using a separate subdomain, for example my-tunnel.domain.com as it will free up the root record for other uses.
You can technically just add the tunnel DNS record cname to each subdomain you create, however that becomes somewhat cumbersome, so by having one static record you can instead point everything at, it will give you the flexibility to be able to update and change all of your services in future to new tunnels or destinations without having to do lots of edits.
Getting the tunnel dns record to use
Tunnel DNS records are in the format of tunnel-id.cfargotunnel.com
You can get the tunnel ID from the tunnel status page, under the name.

Step 2 - Configure Security (Optional)
Login to your Cloudflare Zero Trust Dashboard again.
Once logged in, on the left, expand access, then click "Websites", then in the middle of the screen, click your domain.

WAF Security
On the left, click "Security", then "WAF".

Finally, click Create firewall rule.
![]()
On the screen that shows, enter the following information -
- Name:
Threat Score >0 - Field:
Threat Score - Operator:
greater than - Value:
0
At the bottom, change the action to Block, then press save.
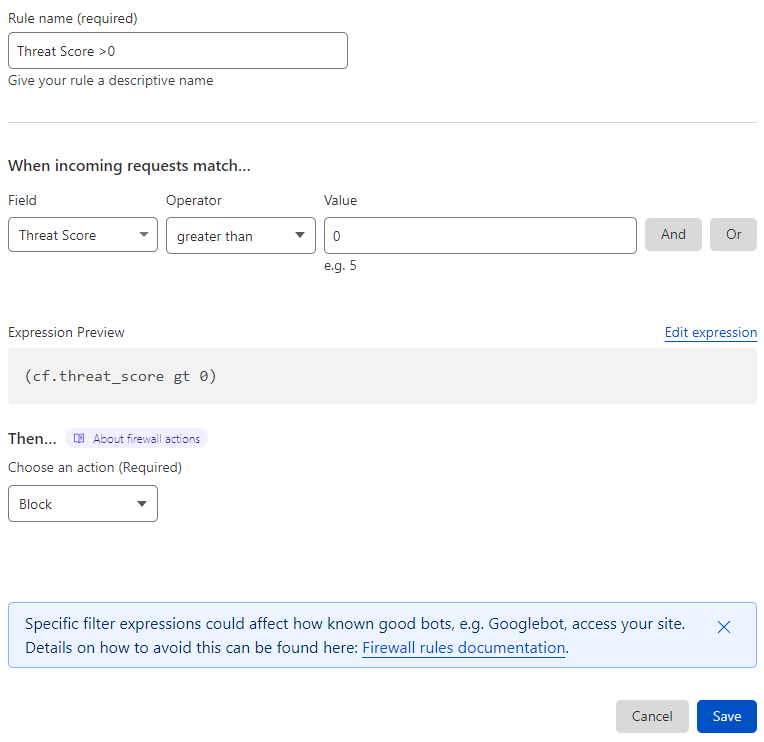
What will this security rule do?
This rule will automatically block any traffic that Cloudflare deems to be threatening, above their rating of "0", which equates to "anything threatening".
Bots
On the left, click "Security", then "Bots".

On the right, toggle the switch to on.
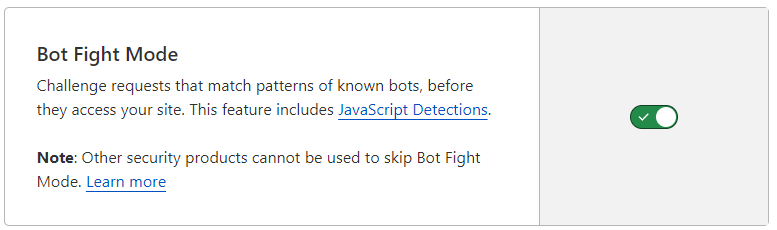
What will this toggle do?
This will generate challege requests from traffic/sources that Cloudflare thinks may be bots, thus preventing your site/s from coming under attack from bots.
DDOS
On the left, click "Security", then "DDOS".

On the right, on the section that begins with HTTP DDoS attack protection, click Configure

On the screen that shows, configure both ruleset and sensativity to default, then click Save.
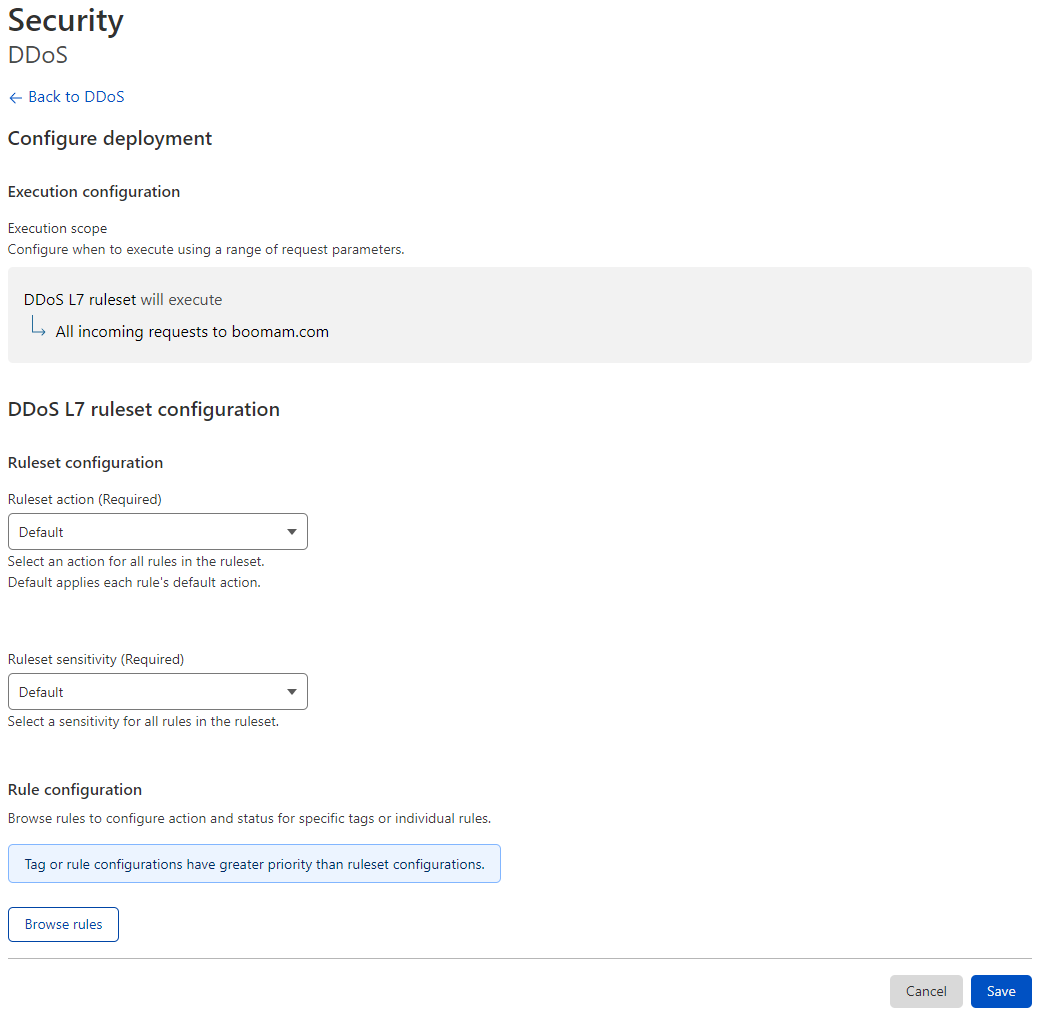
What will this toggle do?
This ruleset enables the default Cloudflare protections against DDOS attacks.
"Settings"
On the left, click "Settings" (under Security still)
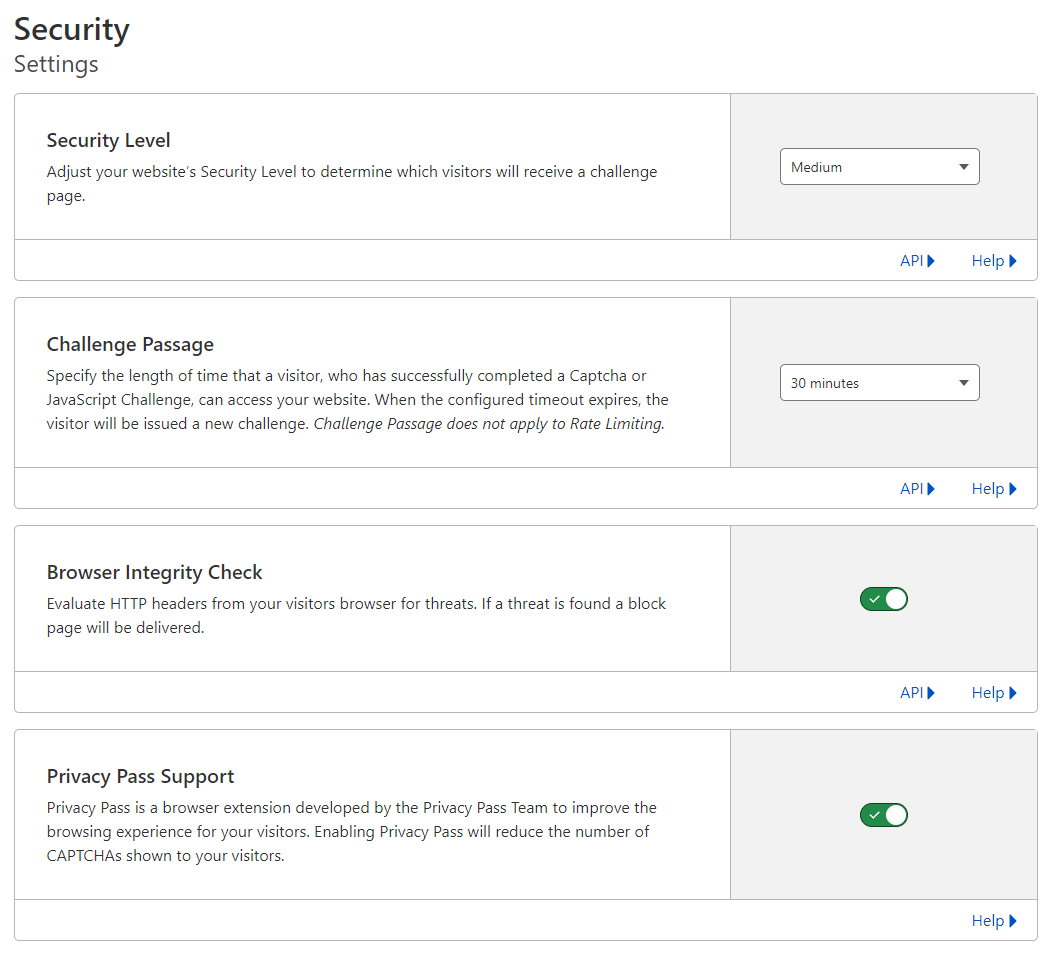
On the right, on the change the following sections accordingly -
- Security Level:
Medium - Challenge Passage:
30 minutes - Browser Integrity Check:
On - Privacy Pass Support:
On
What will this toggle do?
These settings applies some basic security on your site/s based on the perceived security level of the source/client, and specifies captcha settings for suspicious clients.
Step 3 - Certificates
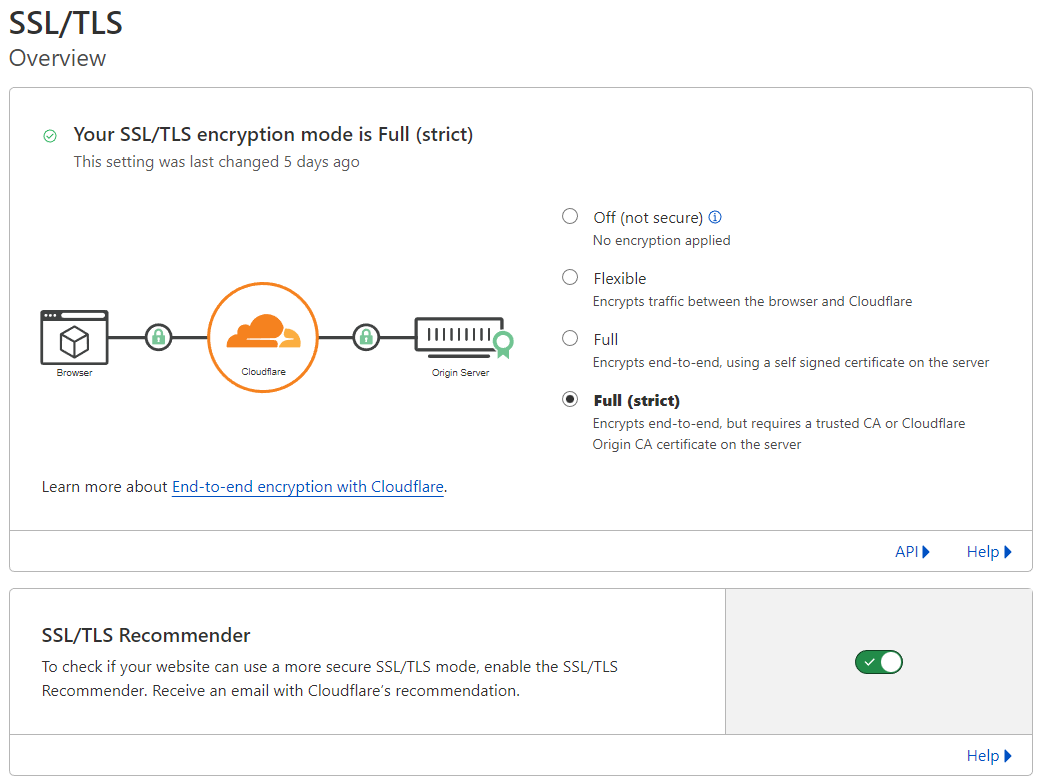
Configure SSL/TLS
On your Cloudflare Zero Trust Dashboard, on the left, click "SSL/TLS", Overview
Toggle -
encryption modetoFull (strict)SSL/TLS Recommendertoon
On the left, click click "Edge Certificates", scroll down, and configure the following fields as such -
- Always Use HTTPS:
on - HTTP Strict Transport Security
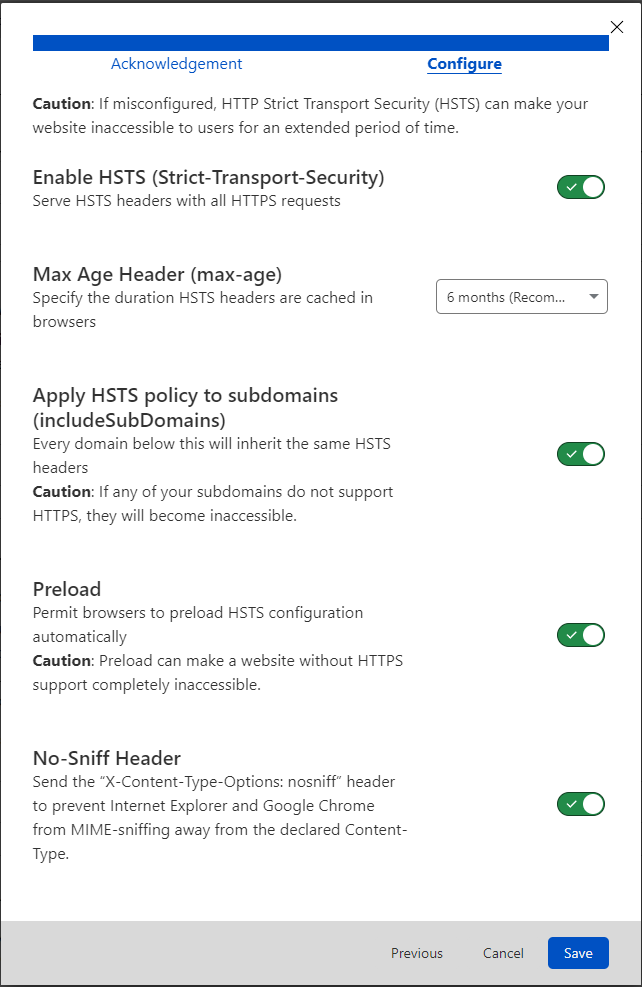
- Minimum TLS Version:
TLS 1.2 - Opportunistic Encryption:
On - TLS 1.3:
On - Automatic HTTPS Rewrites:
On - Certificate Transparency Monitoring:
On - Disable Universal SSL:
Disabled
Create Origin Certificate
On the left, click click "Origin Certificates", then click Create Certificate on the right.

On the screen that shows, enter the following information -
Generate private key and CSR with Cloudflare->Private Key Type=RSA (2048)Hostnames=domain.com&*.domain.comCertificate Validity=1 year
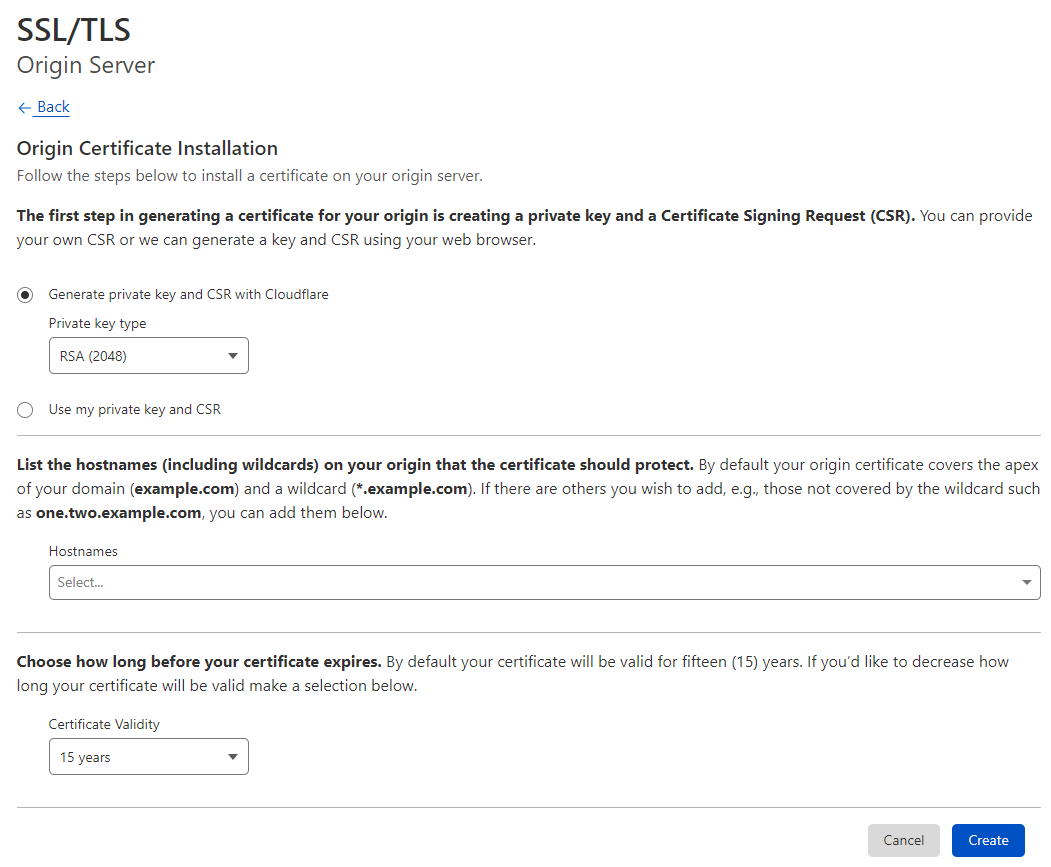
You can set the validity period upto 15 years. Note however, that this isn't the validity of the public facing certificate, but the validity of the certificate used for communication/verification between Cloudflare and your reverse proxy. It is your choice how often you want to revisit this section in future for updates...
Click Create in the bottom right.
It will now display some code blocks.
Change the Key Format to PEM, open your favourite text editor and copy and paste the block labeled Origin Certificate into the file.
Save the file as cloudflare_certificate.pem.
Next, copy the code block labeled Private Key, and save the file as cloudflare_key.key.
Finally, press OK in the bottom right.
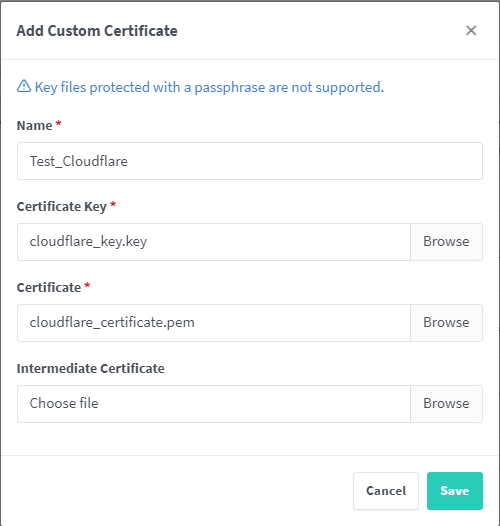
Import Certificate & apply to site
Login to your Nginx Proxy Manager GUI, then click, SSL Certificates on the top menu bar.

On the right, click Add SSL Certificate, then Custom.

On the screen that shows, browse to your certificate files you created/downloaded in the previous steps for each section, give the certificate a name you recognize, for example 'Cloudflare Certificate Nov 2022', then click Save.
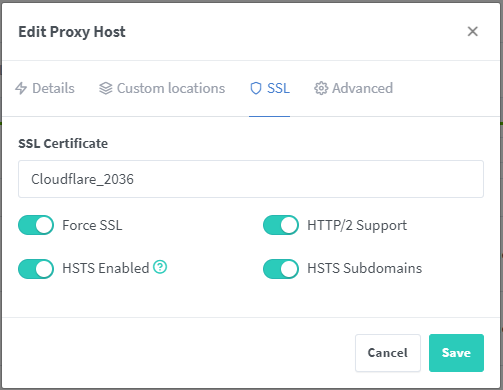
Click on Hosts on the top menu bar, then Proxy Hosts

Pick one of your proxy hosts, go to the 3 vertical dots on the right, edit.

Change to the SSL Tab at the top and change the SSL Certificate dropdown to your new origin certificate, which will show as how you named it during import.
Step 5 - Test
From here you can browse to one of your sites external URLs, and if setup correctly, it will be working correctly, secured by Cloudflares security features.
Adding new sub-domains/hosts in future
At this point, you are fully setup - adding new subdomains for your apps is a twp step process -
- Assign the subdomain to your proxy host in NPM
- Creating the DNS CNAME in your DNS on Cloudflare and pointing it at your tunnel address.
Thats it!
Other Tunning
We can also take steps to apply some extra configuration at Cloudflare's side to enable better performance for your site/s, along with other features.
These are documented below.
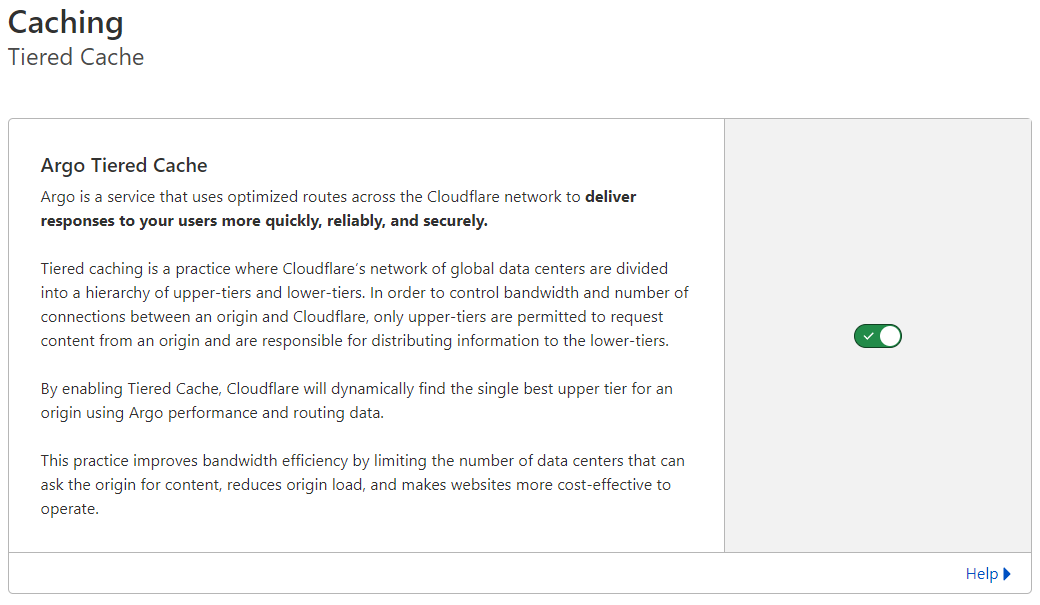
Performance: Tiered Caching
On the sidebar, select Caching, then Tiered Cache.

Toggle the tiered cache to on.
Performance: Network Settings
On the sidebar, select Network.

Adjust the following settings -
| What | Setting | Note |
|---|---|---|
| HTTP/2 | On | |
| HTTP/2 to Origin | On | |
| HTTP/3 (with QUIC) | On | |
| 0-RTT Connection Resumption | Off | |
| IPv6 Compatibility | On | |
| gRPC | Off | |
| WebSockets | On | |
| Onion Routing | On | |
| Pseudo IPv4 | Off | |
| IP Geolocation | On | |
| Maximum Upload Size | 100 MB | Max currently possible without an Enterprise license |
| Response Buffering | n/a | Needs Enterprise license |
| True-Client-IP Header | n/a | Needs Enterprise license |
The settings here are ones that ive found works best with the hosted services i generally use, as certain ones can break functionality. So be careful when changing these, and test thoroughly!
Performance: Optimization
On the sidebar, select Speed, then Optimization.

Adjust the following settings -
| What | Setting | Note |
|---|---|---|
| Image Resizing | n/a | Needs Pro license |
| Polish | n/a | Needs Pro license |
| Auto Minify | Off (all) | I've seen this cause issues with common self-hosted apps, like NextCloud |
| Brotli | Off | |
| Early Hints | On | |
| Automatic Platform Optimization for WordPress | n/a | Needs both WordPress usage, and a WP License |
| Enhanced HTTP/2 Prioritization | n/a | Needs Pro license |
| TCP Turbo | n/a | Needs Pro license |
| Mirage | n/a | Needs Pro license |
| Rocket Loader | Off | I've seen this cause issues with JS heavy sites |
| Automatic Signed Exchanges (SXGs) | n/a | Needs Pro license |
| Prefetch URLs | n/a | Needs Enterprise license |
| AMP Real URL | Off | Personal choice, probably un-needed by 99% of sites |
| Mobile Redirect | Off | Personal choice, probably un-needed by 99% of sites |
Troubleshooting
If you keep getting random certificate errors, you may need to turn on No TLS Verify in your tunnel settings.
Next Steps
The steps in this guide gets the basic framework for a much more secure (and faster) hosting scenario for your applications and services.
Logically, the next step should be IAM configuration to help add an additional layer of security.
There is a guide here for that.